The iPad has emerged as more than just a personal device. Its versatility has been harnessed in professional settings, with the iPad kiosk mode standing out as a compelling feature.
This mode transforms the iPad into a dedicated tool, focusing users on a singular task or application.
Whether you’re a business aiming to enhance customer engagement, an educator looking to streamline digital tests, or an event organizer seeking seamless registrations, understanding how to set up and manage the iPad kiosk mode is crucial.
Dive into this guide to master the nuances of this transformative feature and unlock the full potential of your iPad in a professional setting.
People use the FaceTime application on iPhones and iPads, but many want FaceTime on PC. You can get it on a PC with easy tabs.
Table of Contents
What is iPad Kiosk Mode and Why to Use it?
 iPad kiosk mode, often called Guided Access, is a feature built into iOS devices that allows users to lock the iPad to a single app.
This mode restricts users from accessing other apps, notifications, or system settings when activated.
Essentially, the iPad becomes a dedicated device for that particular app or function, ensuring a focused and controlled user experience.
Are you a fan of an Apple product and want to purchase Apple Macbook, Watch, or tablet? then must check our articles regarding all kinds of Apple alternative options.
Why Use iPad Kiosk Mode?
- Enhanced User Experience: You eliminate potential distractions by locking the iPad to a specific app. Whether a digital menu at a restaurant or an interactive display at a museum, users get a streamlined experience without unrelated notifications or prompts.
- Security: iPad kiosk mode ensures that users can’t tamper with the device settings or access unauthorized apps. It is especially crucial in public settings where you want to protect sensitive information or prevent misuse.
- Versatility: From trade shows and conferences to retail stores and educational institutions, the applications of iPad kiosk mode are vast. You can use it for registrations, surveys, digital catalogs, and interactive displays.
- Cost-Efficient: Instead of investing in specialized hardware for specific tasks, you can repurpose an iPad with kiosk mode. This saves money and offers the reliability and performance of Apple’s ecosystem.
- Easy Setup: Activating the iPad kiosk mode is straightforward. With just a few taps in the settings, you can transform your iPad into a dedicated kiosk with no technical expertise required.
- Data Collection: For businesses conducting surveys or gathering feedback, the iPad kiosk mode ensures consistent data collection without the risk of users navigating away or altering the process.
Components of an iPad Kiosk

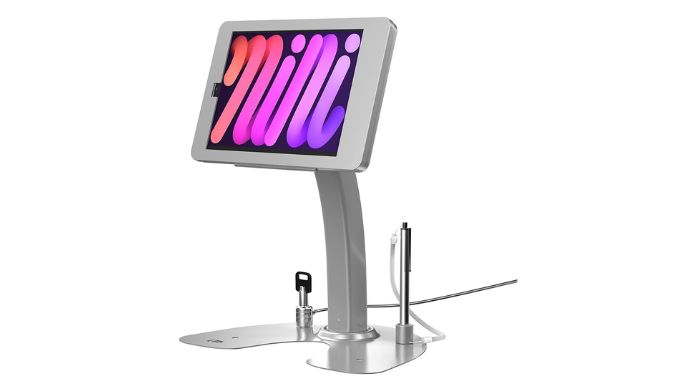
- iPad Device: The primary component will display the content or run the application.
- Kiosk Stand: A physical stand or enclosure that holds the iPad securely, often with anti-theft features.
- Power Source: Ensures the iPad remains charged, mainly if it will be used for extended periods.
- Single App: The specific application or content you want to display.
How to Set Up iPad Kiosk Mode?
Two primary methods exist to set up an iPad in kiosk mode: Single App Mode and Guided Access.
Single App Mode
 Before we jump into the setup, it’s essential to grasp what Single App Mode in iPad kiosk mode entails.
This feature locks the iPad to a single application, preventing users from accessing other apps, notifications, or system functionalities.
It’s perfect for presentations, point-of-sale systems, or educational apps where you want to keep the user’s attention undivided.
- Navigate to Settings: Start by unlocking your iPad and opening the app.
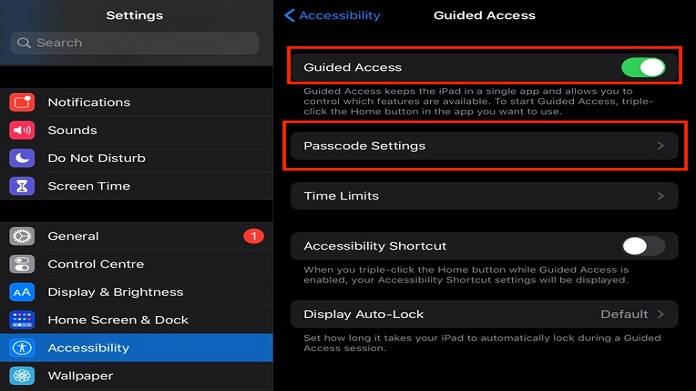
- Dive into Accessibility Options: Within Settings, scroll down and select Accessibility. This section houses various features to enhance the user experience, including our sought-after iPad kiosk mode.
- Activate Guided Access: You’ll find Guided Access under the Learning section. Tap on it and toggle the switch to ON. This feature is the foundation of the Single App Mode.
- Set a Passcode: For security, you’ll need to set a passcode, ensuring only authorized users can exit the Single App Mode. Pick a memorable yet secure passcode.
- Launch Your Desired App: Exit the Settings and open the app you wish to lock in Single App Mode.
- Activate Single App Mode: This action opens the Guided Access interface. Circle any screen areas to disable, adjust settings as needed, and tap Start in the top right.
- Enjoy a Distraction-Free Experience: Your iPad is now locked to the app you’ve chosen, providing users with a focused and streamlined experience.
- Exiting Single App Mode: To go to Single App Mode, triple-click the home (or top) button, enter your passcode, and tap End in the top left.
Guided Access
 Before diving into the setup, it’s crucial to understand Guided Access. As a part of the iPad kiosk mode, Guided Access restricts users to a single app, preventing distractions or unauthorized exits.
It’s the perfect tool for presentations, exams, or any scenario requiring undivided attention.
- Head to Settings: Kickstart the process by opening the Settings app on your iPad.
- Tap into Accessibility: Within Settings, go to Accessibility. This section houses various features, including our focus: iPad kiosk mode.
- Activate Guided Access: Scroll to find Guided Access under the Learning category. Toggle the switch to ON to activate this feature.
- Secure with a Passcode: You’ll need to set a passcode to ensure only authorized users can exit Guided Access. Choose a passcode that’s both memorable and secure.
- Launch Your Chosen App: Exit Settings and open the app you wish to lock using Guided Access.
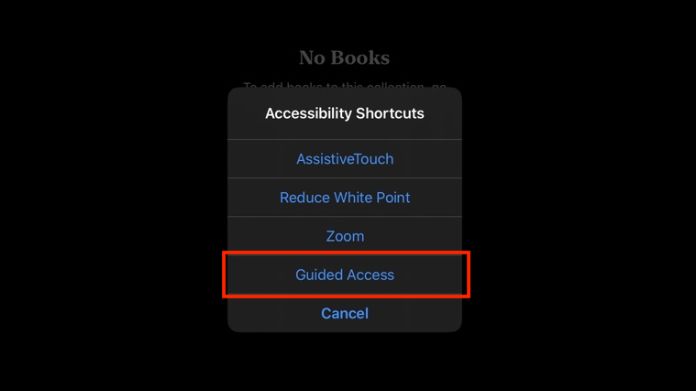
- Engage Guided Access Mode: With your app open, triple-click the iPad’s home (or top) button to access the Guided Access interface. Adjust settings as needed, then tap Start to lock the app.
- Experience-Focused Interaction: Your iPad is now in a dedicated mode for the chosen app, ensuring users engage without distractions.
- To Deactivate Guided Access: To exit, triple-click the home button (or top button), enter the passcode, and tap “End” to return to the standard iPad mode.
How to Manage an iPad Kiosk?
Leveraging the iPad kiosk mode can transform the device into a single-purpose powerhouse.
However, managing it effectively is crucial to ensure optimal performance and user experience.
Here’s a guide to help you master the management of an iPad kiosk.
1. Regularly Update the Software
To ensure smooth operation and security, regularly check for iOS updates. Keeping the software up-to-date ensures that your iPad kiosk mode runs seamlessly and benefits from the latest features and security patches.
2. Monitor Battery Health
While iPads boast impressive battery life, keeping an eye on battery health is essential. Consider a permanent charging solution to prevent unexpected downtimes if the kiosk is continuously used.
3. Secure the Device Physically
A robust enclosure gives your kiosk a professional look and protects the iPad from theft or tampering. Ensure the enclosure has openings for charging and other essential functions.
4. Regularly Review App Performance
The app running in the iPad kiosk mode should be monitored for any glitches or performance issues. Regularly update the app and address any user feedback to enhance the experience.
5. Limit Notifications
To maintain a distraction-free environment, turn off unnecessary notifications. It ensures that users remain focused on the kiosk content without interruptions.
6. Backup Data
Suppose your kiosk regularly collects user data or feedback to back up this information. It ensures you don’t lose valuable insights due to any unforeseen issues.
Guided Access Vs Single App Mode
Let’s delve into the distinctions between these two modes to help you make an informed choice.
Guided Access: The User-Friendly Lockdown
- Purpose: Guided Access is designed for temporary sessions where the iPad needs to be restricted to a single app. It’s perfect for presentations, educational settings, or even handing your device to a child without worrying about them accessing other apps.
- Setup: Activating Guided Access is straightforward. Within the iPad’s settings, you navigate to Accessibility and toggle on Guided Access. Once set, a triple-click of the home button (or top button on newer models) activates this mode for the currently used app.
- Flexibility: One of the standout features of Guided Access is the ability to turn off specific touch areas on the screen, ensuring users don’t interact with certain buttons or features.
- Exit: Exiting Guided Access requires the same triple-click action, followed by a passcode input, making it user-friendly and easily reversible.
Single App Mode: The Dedicated Solution
- Purpose: Single App Mode is the go-to for businesses and institutions requiring a more permanent iPad kiosk mode solution. It’s ideal for point-of-sale systems, information kiosks, or any scenario where the iPad needs to run a singular app for extended periods.
- Setup: This mode requires a more involved setup, typically through Apple’s management tools like Apple Configurator or Mobile Device Management (MDM) solutions.
- Security: Single App Mode offers a higher level of security. Once activated, the device is locked to that specific app until an administrator decides otherwise.
- Exit: Exiting Single App Mode isn’t as straightforward as Guided Access. It requires the administrator to deactivate the mode through the management tool initially used for setup.
Conclusion
Setting up an iPad in kiosk mode can enhance user experience and provide specific services or information without distractions.
Whether you choose Single App Mode or Guided Access, it’s essential to understand their features and limitations to select the best option for your needs.


