Want to know how to screen record on Chromebook? We have you covered whether you want to record what’s happening on your screen or build a software lesson.
This article will demonstrate several methods for recording a screen on a Chromebook and offer solutions to specific issues frequently encountered by those attempting to do so.
Luckily, the process is easy regardless of your chosen method, so let’s look at each step through TechSpunk guidelines.
Let’s get going!
Table of Contents
What Exactly is Screen Recording on Chromebook?
 Screen recording on a Chromebook captures a video of everything happening on your Chromebook’s screen, including the cursor movement and any audio being played.
Screen recording can be valid for creating video tutorials, recording gameplay, capturing video calls or meetings, or troubleshooting technical problems.
Chromebooks may have built-in screen recording tools or need third-party software to record the screen.
Once the recording is done, you can save and share the video file with others as required.
In the next section, you will see the step-by-step guide on how to screen record on Chromebook.
Step-by-step Guide to Screen Record on Chromebook
Uncover the answer on how to screen record on Chromebook.
For question about how to screen record on Chromebook, there are two ways to record the screen: the Screen Capture option and the Keyboard shortcut.
Before going forward, you can check the best mouse mover software, which is one of the most extreme virtual creations changing how people use PC these days.
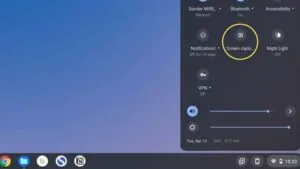
1. Using a Screen Capture Option
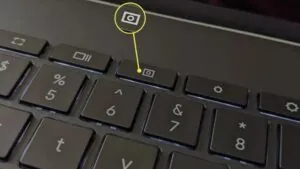
 The screenshot you take on your Chromebook using the keyboard shortcut Ctrl + Shift + Switch Window will be stored in your Downloads folder.
You need to install a screen recorder extension to capture your screen.
You must first install the Google Chrome Web Store plugin to use it. After installing and enabling the extension, you can start recording by clicking the button in the Screen Capture toolbar.
You must create an account before recording for longer than a minute.
Before using the extension to record the screen, you must utilize the Chromebook’s built-in screen capture feature by pressing Ctrl + Shift + Switch Window.
When you do this, a small menu will seem on the right-hand side of your screen, allowing you to choose whether to record the entire display or only just part of it.
If you want a high-quality keyboard and monitor for everyday use, then you can check out our guide on the best gaming keyboards and top gaming monitors for you.
2. Using Keyboard Shortcuts
 Using keyboard shortcuts, you can get the solution over the how to screen record on Chromebook.
Now that that’s out of the path, here are some global keyboard shortcuts to help you screen record on Chromebook:
- Ctrl + Alt + R – Starts/Stops a Recording
- Ctrl + Shift + P – Pauses/Resumes a Recording
- F11 – Full-Screen Mode
- Esc – Stops a Recording or Exits Full-Screen Mode
- Ctrl + Alt + Shift + R – Displays the Recording Options Dialog Box.
Additionally, you can record your Chromebook’s screen using various shortcuts that are specific to each browser:
While Ctrl+Shift+U captures a screenshot of what is currently on your screen, Ctrl+Shift+H starts and pauses video recording.
How to Screen Record on Chromebook Without Audio?
First, click the gear icon on the snipping tool and turn on the Record microphone before pressing the record button.
You won’t need to manually turn on the Microphone for subsequent recordings because the snipping tool will preserve the settings.
Repeat the previous procedures while turning off the Record microphone option to record without audio.
You can record your screen while listening to any media audio on your Chromebook. Additionally, the Microphone will pick up any ambient noise.
As a result, if you are screen recording on your Chromebook with audio, make sure to do so in a place with little background noise.
Even better, if you have one, utilize an external noise-canceling microphone. This could help remove background noise and improve the recording’s audio quality.
Which Are the Common Screen Recording Problems?
Here are some ways to fix common problems if your Chromebook has trouble recording your screen.
1. Chromebook Fails to Save Screenshots and Recordings
You can try the following if you are having problems getting a Chromebook to store your images or recordings:
- Choose Storage Management under Chrome OS Settings.
- Ensure your Chromebook is configured to allow local files rather than cloud storage before beginning.
- Go to Settings > Device > Storage & Reset, then click on Details if you have trouble saving screenshots or recordings made with the Chromebook screen recorder to a USB drive.
- Choosing “Allow Filesystem Read/Write” would be advantageous for saving screenshots and recordings on a USB device.
2. Chromebook Doesn’t Record Audio
Your Chromebook’s Microphone may not be recording audio for various reasons, one of which is that it is off.
Open the menu and select Settings > Advanced to check. Make sure the Microphone is listed under Default Input and that it reads On as you continue to scroll down.
Check to see if your Chromebook has detected your external Microphone if you have one.
If your Chromebook has all the necessary components turned on and the external Microphone is operational.
However, there is still no sound; check your apps because not all support audio recording.
Ensure the app has the required permission before recording any audio-enabled apps (like video conference calls) you need to do so.
If none of these suggestions work, make sure your Chromebook is not muted and restart the computer.
Final Wrapped!
So there it is—everything you need to know to answer your question about how to screen record on Chromebook.
Whether you want to record a video tutorial, take screenshots for a presentation or document, or make a short recording, these ideas can help you rapidly record whatever is currently visible on your screen or a specific window.


